Overview
With Model Packer, you can prepare your 3D models for sending to 3D stocks or Asset Libraries.
Just a couple of clicks and you will create an archive with your model or scene.
Video with Model Packer Features
This script can be used for
- Preparation of 3D models for 3D stocks
- Convenient transfer of models to a colleague/client/customer
- Cataloging and storage of your 3D models
- Organization of storage with 3D models in the local network
- Creating archives for a special standard for Asset Libraries
- To standardize 3D models by manufacturers' websites
Features
- Fixing broken geometry (Reset XForm, BoxTrick, DetachTrick, Snapshot)
- Grouping/Ungrouping Objects
- Setting the model to the center of the stage
- Adding information about the 3D model (name, manufacturer, tags, copyright, description, etc.)
- Generating manifest files (txt, json, ini, xml)
- Translation of tags into different languages (Google Translate)
- Adding a preview with the ability to overlay a watermark
- Saving 3Ds Max scene for the minimum version
- Removing trash objects and helpers
- Removing Track Notes, unnecessary assets and other garbage in the scene
- Creation of export formats (fbx, obj, 3ds, mat)
- Renaming objects
- Renaming textures
- Renaming materials
- Renaming groups
- Removing unnecessary layers
- Convert to Corona Renderer on the fly and create a separate scene
- Packing only the necessary textures and assets
- Correct directory structure
- Correct file naming
- Archive creation
- Tool to create your own presets
- Import/Export Presets
- Instant updates
- Multilanguage interface
- Hints
- API
- Protecting models with a Tracking Tag
- Batch Packing
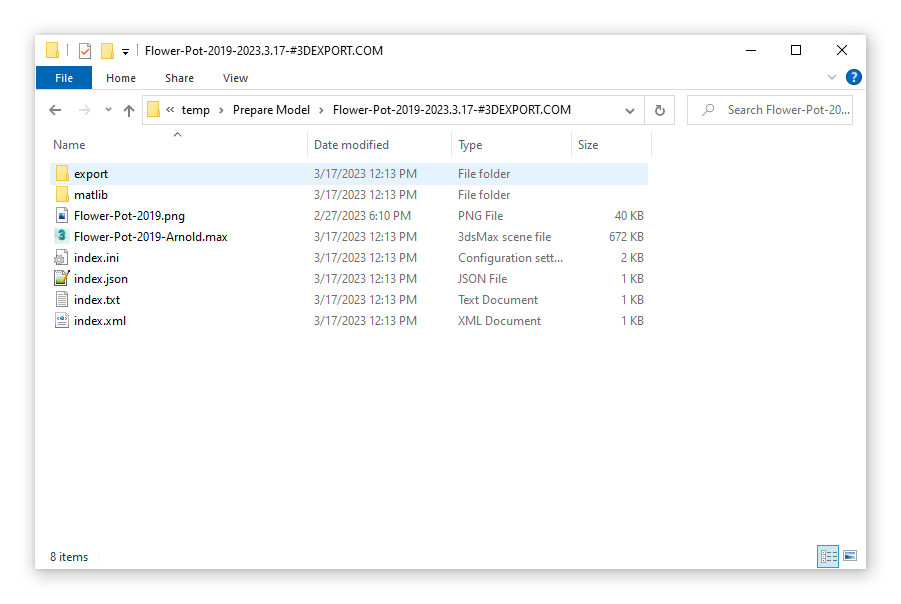
Example directory structure and names
Model Packer helps to avoid common mistakes
If you have ever come across the fact that your models did not resemble moderation, at least for one of the reasons listed below, you should definitely try Model Packer.
This script will help to avoid common mistakes of the "human factor ":
- Old textures from other models remain in the scene if you open Assets Tracker (Shift + T)
- UV_Checker.jpg remains in the scene if you open Assets Tracker (Shift + T)
- Position of objects not in the center of the scene
- Wrong version set for FBX
- Extra helper objects in FBX
- The Viewport is not focused on the model, it feels like the scene is empty
- FBX is not saved for the current version of the render
- Texture or asset paths are not striped
- There may be broken geometry and flipped polygons in the scene
- The *.max version of the scene is not saved under the minimum version
- Forgot to add some textures to the archive
- Scene saved with incorrect Gamma
- There is no Material Library in the archive (* .mat)
- There is no *.mtl file for *.obj in the archive
- You added a preview, but forgot to set the watermark
- The scene uses paths or names that are not in English, causing an encoding problem for others
- Lights or cameras are not removed in the scene
- There are objects in the scene with the Turbo Smooth modifier with an iteration greater than 3
- Hidden objects remain in the scene
- Not needed animation keys in the scene
How to use
Open the scene with the model, it is desirable that the model is in a separate scene.
Run the script Model Packer , select from the list of presets the required 3D stock or FULL CUSTOM preset, or perhaps your personal preset.
Step 1
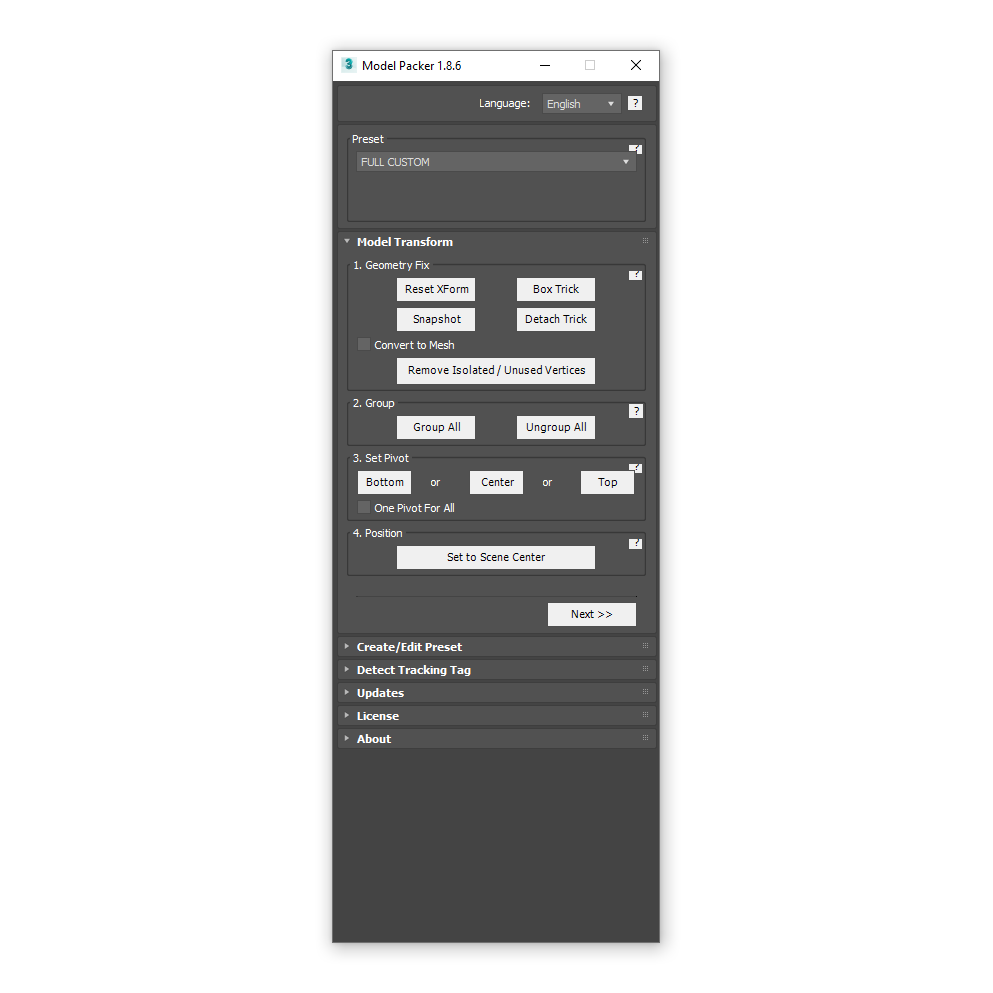
In the first step Model Transform, select your model (objects), reset the transformation using the Reset XForm, BoxTrick, DetachTrick, Snapshot.
Group the model and, if necessary, set it to the center of the scene using the Group and Set to Scene Center.
We strongly do not recommend leaving modifiers, light sources, cameras, helper objects and unnecessary layers!
Click Next to go to the next step.
Step 2
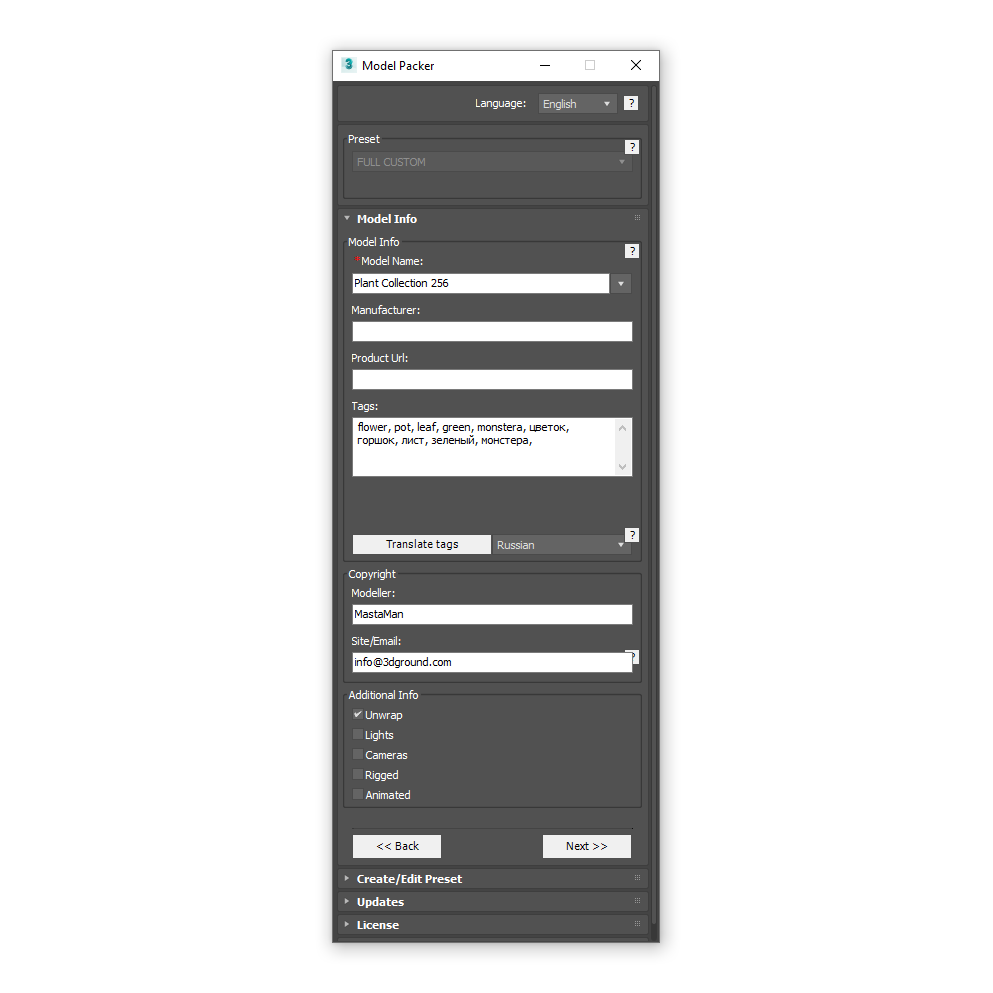
In the second step of Model Info, be sure to fill in the correct name of the model. Fill in the rest of the information if necessary, such as: tags, copyright, manufacturer and add. information.
Click Next .
Step 3 (Optional)
If the Model Description page is available for the selected preset, fill in the description (optional).
Click Next .
Step 4 (Optional)
If the Preview page is available for the selected preset, add a preview of the model (for some presets it is required).
Click Next.
Step 5
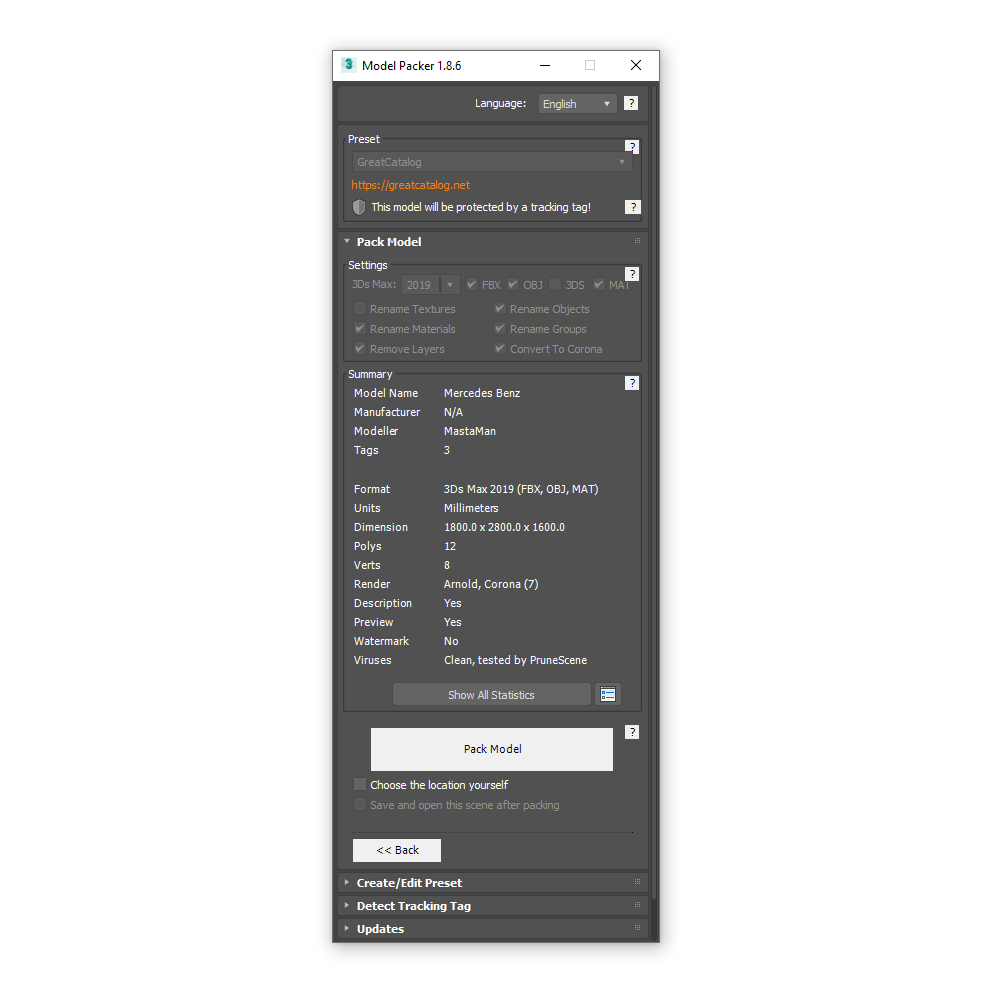
At the last step Pack Model look at the Summary, make sure everything is done correctly: the correct preset is selected, the model has the correct name, the correct render and other points.
Click Pack Model and in a few seconds you will see an archive with your model.
Generally accepted standards in the 3D industry
Based on many years of experience and the rules of various 3D stocks, Model Packer is a kind of gold standard for preparing 3D models.
The script takes into account even more than indicated in the list below. You can verify this by reviewing the rest of this guide.
Standards and guidelines:
- The model must be in the center of the scene and all Viewport must be focused on the model.
- In a scene with a model, avoid unnecessary objects or garbage: lights, cameras, helper objects, animation keys, assets, unnecessary geometry.
- Attach as much as possible, the fewer individual objects, the easier it is to work with the model and more objects causes less performance for Viewport.
- Check the entire model for flipped polygons in Clay mode.
- Very important do Reset XForm, BoxTrick, DetachTrick, Snapshot for the entire model to avoid problems with broken geometry.
- All stacks must be collapsed, otherwise there may be a problem with Units. Do not even leave the TurboSmooth and MeshSmooth modifiers, otherwise in the new versions of 3Ds Max, when collapsing the stack, isolated unused points remain!
- All objects must be named correctly and are in one separate layer with the same name as the model.
- Don't use third party plugins like Complex Fresnel, Bercon Noise, Siger Noise, etc.
- Don't use OSL shader. Since there may be incompatibility of older versions of shaders with newer versions of 3Ds Max.
- All names, including paths of textures and assets, should not contain special characters or spaces, only letters A-z, numbers and instead of spaces symbols "-" or "_". Some users may have problems with encoding and opening the 3D model correctly if they do not to do this.
- The texture paths must be striped out. And shouldn't contain the real paths of your computer.
- Be sure to add the FBX export format. Don't forget to save FBX for different renders if you add several different scenes. FBX can save materials and some settings correctly, take advantage of this.
- For FBX, lights or groups may not be exported correctly, turning into helper objects. Don't forget to delete everything you don't need before exporting.
- When exporting to OBJ format, do not forget to add a * .mtl file to the archive.
- Save Material Library (* .mat), this will help in some cases to restore materials for the model.
- Add description (txt) and preview (jpg) to the model. This will help you better understand what is in the archive. Place the main preview in the root of the archive, it helps to see what is in the folder without opening it, since the icon with the folder will have a preview of the model.
- Save 3Ds Max scenes to the minimum version.
- Please use ZIP format for archiving as it can be opened on any platform.
Are you still creating archives manually? Do you keep all these rules in mind and create your own archive for each separate 3D stock?
Leave this for Model Packer script, let nothing distract you from creating the 3D model!
Install
Newer versions of the Model Packer use the Universal Installer to help you with the installation, as well as create buttons in the Main Toolbar and Quad Menu. Everything is done so that you make a minimum of effort and do not waste valuable time.
Step 1
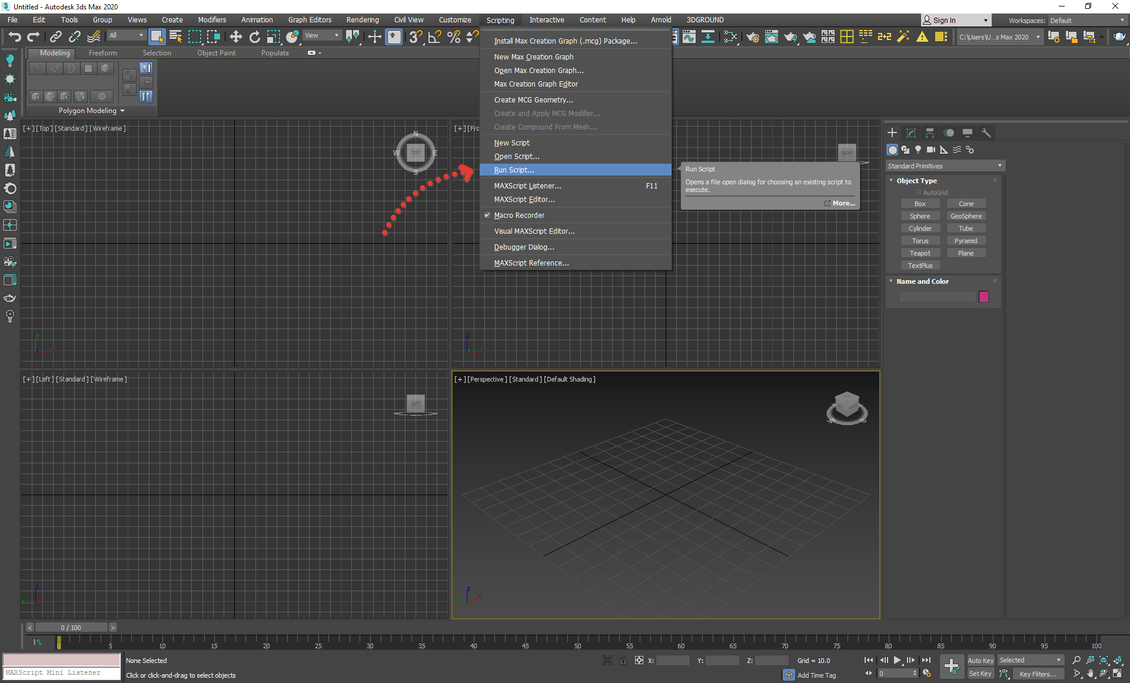
Run the installer, just Drag&Drop the ModelPacker.mzp file into the Autodesk 3Ds Max Viewport.
Or run ModelPacker.mzp using the Scripting → Run Script drop-down menu.
The entire installation process is in this video instruction. Another script (Prune Scene) is used as an example, but the process is absolutely identical for the Model Packer!
Installation Using Prune Scene As An Example (Video)Step 2
After starting the installer, you will see the following window:
Select the interface language, click Next.
Step 3
Read and agree to the license agreement, click Next.
Step 4
At this step, you can customize the installation options. For example, where to create a button in the interface (Main Toolbar, Quad Menu, Main DropDown Menu) .
We recommend leaving all the default options and click Next.
Below is a description of what each option does if you want to change anything.
Tool Bar (Recommended) - creates a button with an icon on the main toolbar.
Main DropDown Menu - creates a new dropdown menu named 3DGROUND next to the Help dropdown menu with subitem Model Packer. If other scripts from this site are installed, they will be added to the 3DGROUND dropdown menu.
Quad Menu - creates a new Model Packer menu item in QuadMenu.
Use HiDPI icons - use (SVG) vector icons for high resolution monitors. If your 3Ds Max is greater than 2018, which has official support for higher resolution monitors, you can enable this option. Icons will work for regular monitors as well as monitors with higher pixel density.
Setup Options - you can select Install or Remove script.
Step 5
At this step, the installer copies all files and creates menu items. You will need to click Yes if the installer does not have enough rights to copy. See screenshot below:
If you click No, there is no guarantee that the script will work correctly and all files will be copied!
Step 6
If the installation was successful, you will see the following window. Click Finish to exit the installer.
You can now run the script from the Main Toolbar or the 3DGROUND dropdown menu.
Note!
Depending on the settings selected during installation, these icons in the screenshot may not appear in the interface.
Uninstall
Run the installer and follow the instructions. For details, see Installation - Step 1, Step 2, Step3.
At this step of choosing installation options, select Remove, see the screenshot above for details. Click Next and follow the instructions.
During the uninstallation process, if the installer does not have enough rights, you will need to click Yes in the UAC window, see the screenshot below:
After successful removal, you will see a window:
Multilanguage
In new versions of Model Packer, support for different interface languages has been added.
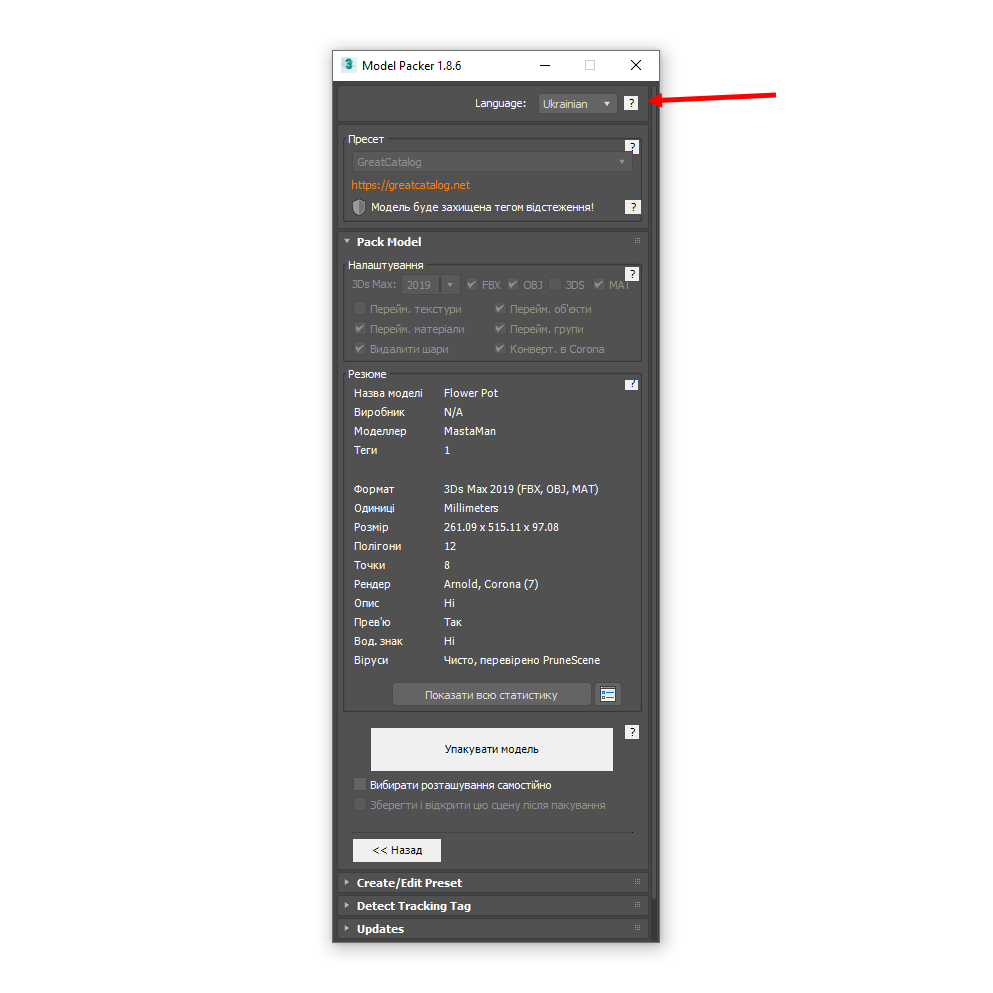
Currently the following languages are supported: English, Russian, Ukrainian, Polish, Vietnamese, Turkish.
You can select the interface language during the installation of Model Packer or after launching it.
Select your language interface from the Language dropdown menu and the interface will instantly be displayed in the selected language, without having to reopen the script.
The list of languages was not compiled at random. The languages that have made the most purchases have been added.
If you want to see Model Packer in your native language, buy a license and support the script itself, maybe your language will be included in the next version?!
Grammatical errors and mistakes in translation are not excluded, write in the comments if you find any inaccuracies.
Or, we can provide all the tools you need to edit the language file!
Selecting a preset
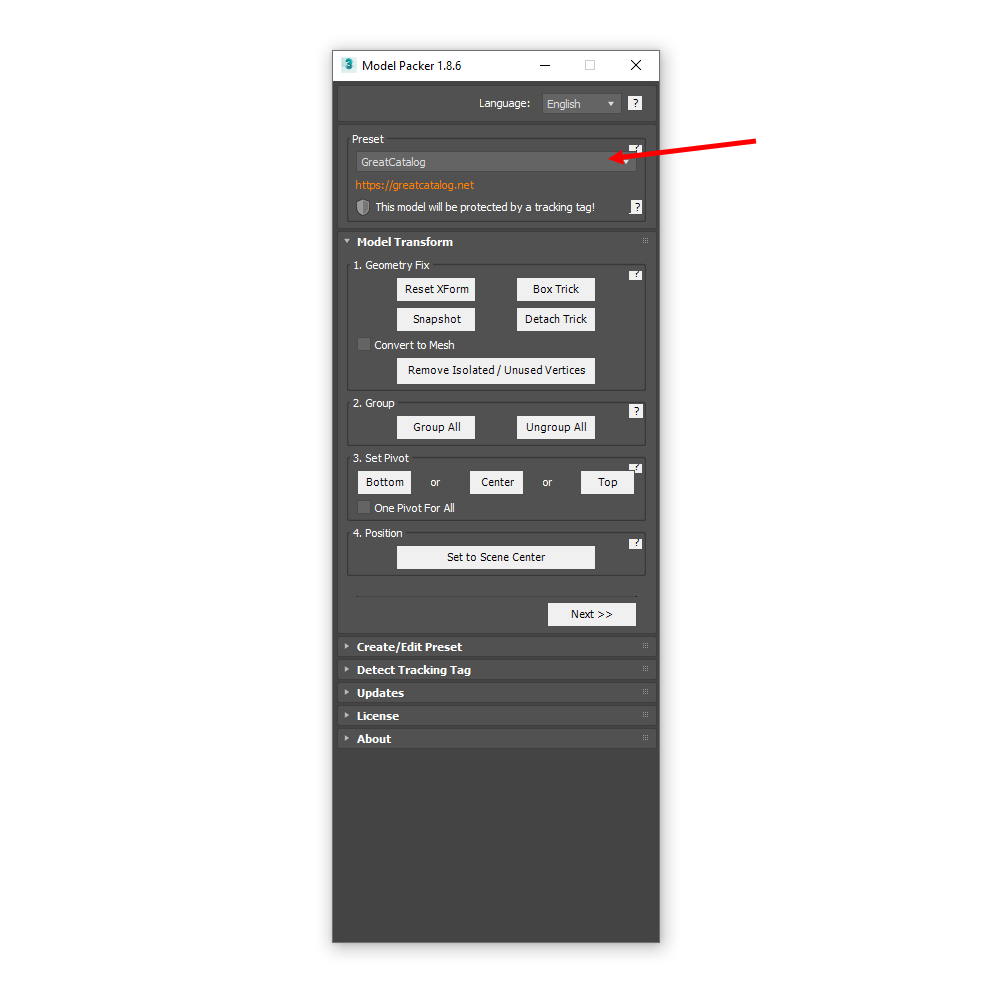
Before starting packing, select the preset you need.
Presets help to automatically set the correct settings for a specific 3D stock.
Thus, choosing, for example, the 3D BAZA preset, you can be completely sure that your model will be moderated and meet all the standards of the site http://3dbaza.com.
The Model Packer implements a page-by-page navigation system that allows you to perform specific actions at each stage. Use the Next (Next) and Previous (Back) buttons to switch between pages. Pay close attention to the prompts, because without some action, the script will prevent you from going to the next step.
The number of presets will increase over time, but if you have not found a suitable preset, we recommend using the FULL CUSTOM preset.
By default, the active preset is FULL CUSTOM. This is a preset in which almost every possible option and setting is unlocked.
For complete convenience, a tool (Create / Edit Preset) has also been created, with which you can create your own presets. You have full control over all the hidden capabilities and potential of the Model Packer. When creating a preset, you can control everything from the file structure to the data that should go into the manifest files.
Tracking Tag
For some presets, the ability to protect models using the Tracking Tag has been added.
If you see the "shield" icon when you select a preset, it means that this 3D Stock has taken care of copyright protection.
Tracking Tag - helps to track the authorship of the model and the service provider (3D Stock) for which the model is loaded.
You can track if there is tracking information in the model using the Detect Tracking Tag tool.
Load the model into a blank scene, navigate to the "Detect Tracking Tag" rollup, then click the "Detect" button.
If the tags are found, they will appear in the list. Click on a tag from the list to display the information.
Here, you will find information:
- 3D Stock logo
- Service provider
- Unique preset identifier
- Model name
- Author's copyright
- Date
- Package information
Such information is embedded in objects, materials, textures and other assets, which undoubtedly increases the reliability of saving the Tracking Tag.
Undoubtedly, the Tracking Tag increases the credibility of the site where models are uploaded and users statistically pay more attention to such presets.
In today's world, information security is a key point that not only users but also service providers (3D Stocks) should think about.
If you are the owner of 3D Stock, you can ask me to enable a Tracking Tag for your preset. To do this, just write to me through the contact form.
ContactModel Transform (Step 1)
This step contains some important tools. We do not recommend ignoring them and following generally accepted rules.
Geometry Fix
It is commonly recommended to use Reset XForm , Box Trick , Detach Trick , Snapshot for your model. This will get rid of various problems with geometry and reveal flipped polygons.
But, it should be take in mind that after these actions, the modifier stack will be collapsed! Nevertheless, it is not recommended to leave any modifiers and even Mesh Smooth (Turbo Smooth), because on different versions of 3Ds Max or even computers, scenes with modifiers behave unpredictably!
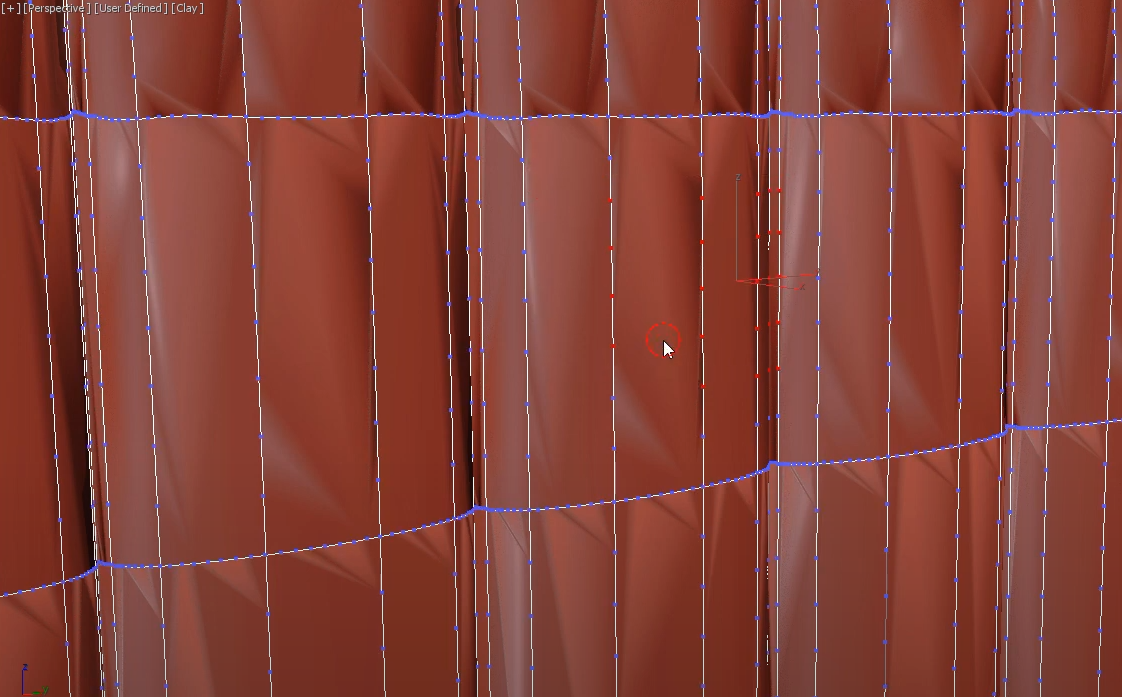
So, for example, if you leave the Mesh Smooth modifier and try to open such a model in newer versions of 3Ds Max, then when the stack collapses, unused isolated vertices may remain. An example of such geometry can be seen in the picture below.
Group
Do not use many different separate objects for the model. Do everything attach as much as possible. If, nevertheless, it is impossible to do without a lot of objects (rig, animation, etc.), combine them into a group Group. All. Avoid multiple groups (group within group). There should only be 1 group for the whole model.
To delete all groups recursively use the tool Ungroup All.
Set Pivot Point
Set the Set Pivot at the point of contact with the object. For most models this will be Bottom, for lights for example Top. It is important not to skip this operation, as it will be easier for others to work with the model. You can manually set the center of mass if none of the options suit you.
Position
Use the Set to Scene Center tool to bring your model to the center of the scene.
Use the experience gained in Model Packer and earn more!
Model Info (Step 2)
Depending on the selected preset, information from this page can be included in the manifest files (txt, ini, json, xml).
In the future, it is planned to make sure that the completed data is transferred to the 3D stock upload page and the necessary forms are automatically filled in.
Model Name
This form is mandatory. The name of the model affects the name of textures, materials, layers and files in the archive.
Do not be lazy and write the correct name, it will help others better understand what is in the archive.
There is a drop-down menu next to the name form, which offers different naming options based on model name, group name, 3Ds Max file, project folder or current date. By clicking on the name that suits you, insert it into the name form!
Note!
You do not have to open the list with hints, but simply move the mouse cursor over the drop-down menu next to the Model Name form and simply turn the mouse wheel to select the appropriate option. This greatly speeds up the name selection process!
Manufacturer
The name or name of the manufacturer. This form is optional.
According to statistics, models from real manufacturers are bought much more often. Therefore, we recommend that you indicate the real manufacturer of furniture, fittings or objects.
Product Url
Link to the product page from the manufacturer's website. This form is optional.
Tags or phrases that characterize the model. This form is optional.
For example: armchair, black leather, two-seater sofa, coffee table, flowers, roses, ikea, carpet, red sofa. The tags must describe: what kind of object (singular and plural) (common name), its properties, state, materials and purpose.
The Model Packer implements a hint system, which is formed on the basis of previously entered data. Hints are saved separately for each preset.
Tags can be translated into different languages thanks to the built-in translator. Select your preferred language from the list, click Translate Tags for instant translation.
To select a hint, use the Up and Down keys, press Enter to add the desired tag.
Usually 3D stocks allow you to fill in tags, but their functionality is not convenient. The Model Packer still implements a convenient set of tags. You can simply copy and paste them on the site.
Copyright
Enter your name and website / email. This form is optional.
If the model or scene was created entirely by you, please include your copyright information. This will make it harder to steal models and may be an additional advertisement for your site.
In the future, it is planned to add this data to the Custom Properties of the model and record it at the Mesh level. How do you like this idea? Write in the comments or if you want such an opportunity in the Model Packer.
Additional Information
Please indicate the required items that match your model. This form is optional.
Items from the Additional Info group, such as Lights, Cameras, Animated, can be turned on automatically if they are found in the scene.
Tags are important not only for 3D stocks, but also for local search. Usually archives with models are stored on a computer in an unzipped state. So, using Total Commander (or other tools), you can search by text in files, which simplifies the task.
To search files using Total Commander, press the Alt+F7 key combination, specify the following settings:
- Search for all * .txt files
- Text search, write words separated by "|"
- Turn on RegEx
- Turn on the required ANSI and UTF-8 encodings
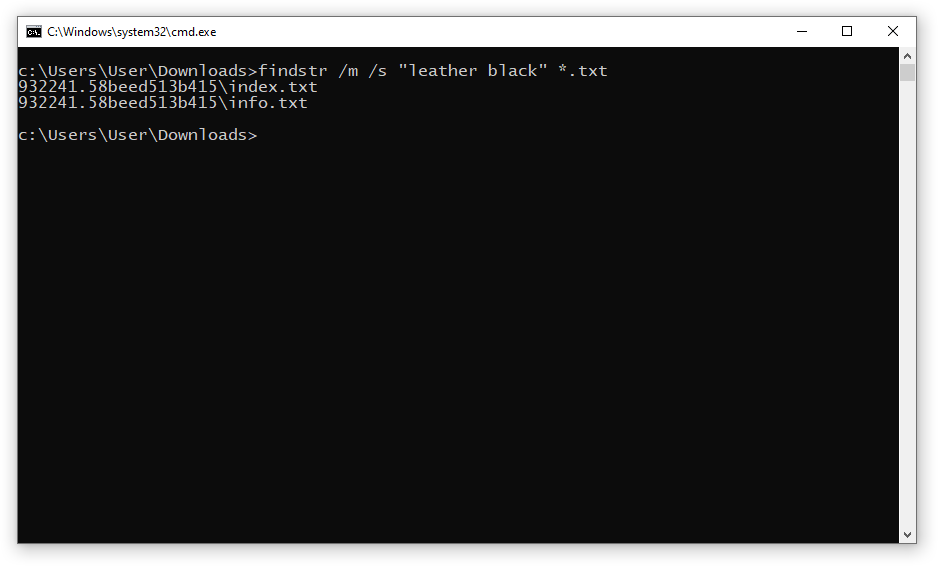
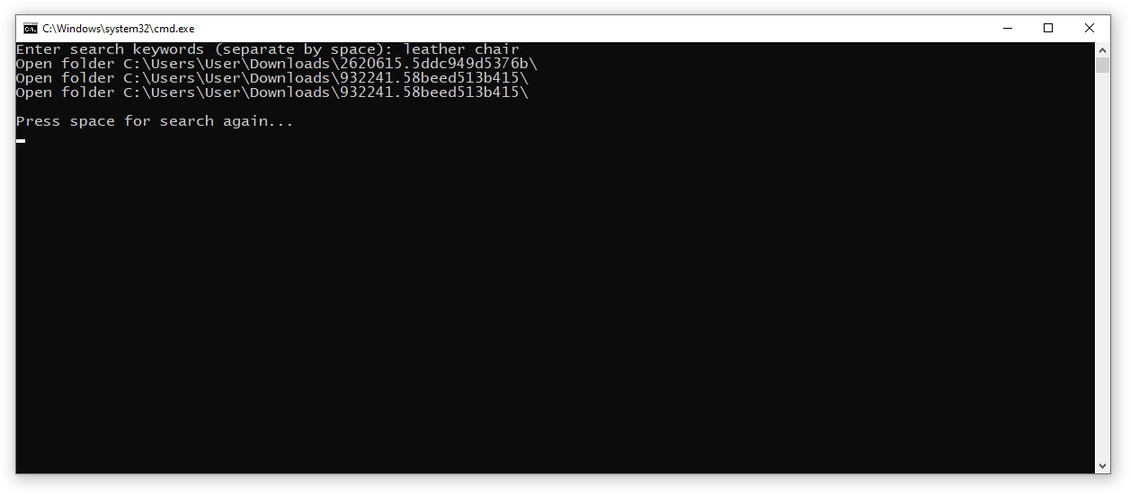
To search through files using the command line, press Win+R, type cmd and press Enter.
Write the command:
Where, "leather black", you can replace with your own search words. Separate words with spaces and do not forget that they must be in quotes!
The search will be performed recursively from the current directory, in * .txt files in all subdirectories. Use the cd command to change the directory.
This is a more complex example using the command line.
The *.bat script is based on the same findstr.
Copy the code below, save it to a file with the "bat" extension, for example "Find in my library.bat".
Place "Find in my library.bat" in your 3D model library folder. The search will be carried out in all subfolders, start with the one containing the *.bat file.
The main condition is that the archives must be unzipped.
Run "Find in my library.bat ", enter search words separated by a space and press Enter.
Folders will be opened for all found models.
This is a fairly primitive way to search, but it works well for small libraries.
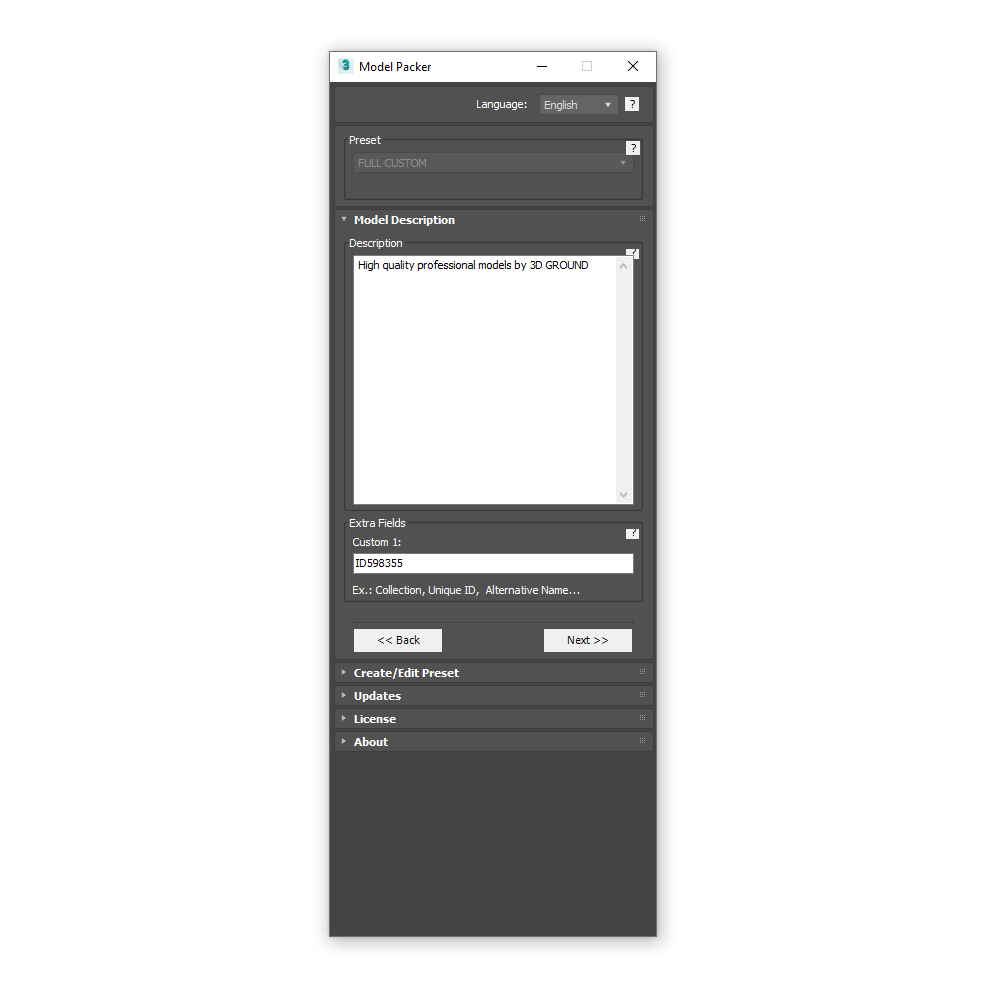
Model Description (Step 3)
Depending on the selected preset, this page may not be displayed.
Description
Brief description of the model. This form is optional.
The description, like the tags, helps in searching through your own library of models and gives a better idea of what is in the archive.
Custom 1
Additional field for information. This form is optional.
This form serves to indicate various information that is not provided in the script.
This can be a unique identifier, article, volume, collection, size, etc.
Preview (Step 4)
Depending on the selected preset, this page may not be displayed.
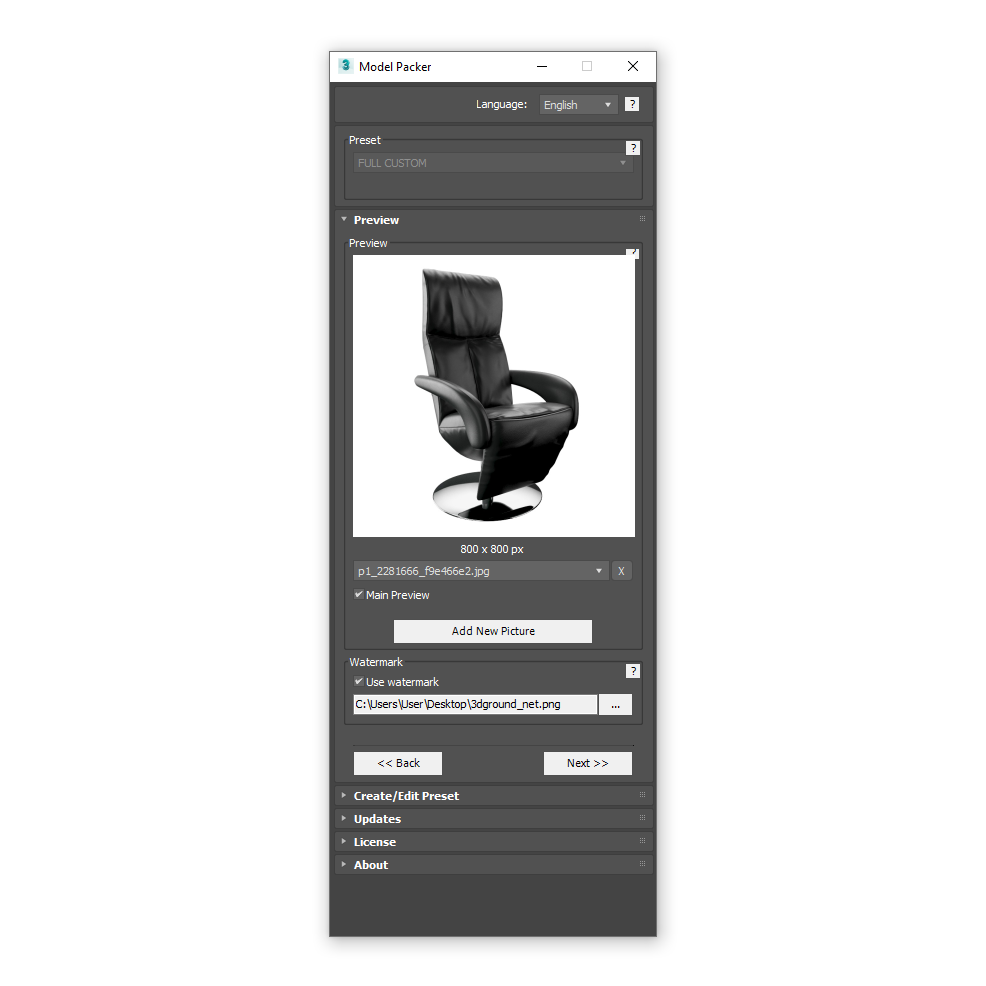
Add one or more previews, this visually helps to understand what is in the archive.
Adding a preview
To add one or more previews, press the Add New Picture button. In the window that opens, select one or more previews and click Open.
The previews added by you fall into the drop-down list. When you select a file name from the list, the preview picture will change.
To remove a preview, select it from the drop-down list, then press the [X] button.
To set the main preview, select a picture from the drop-down list and check the Main Preview.
You can set only one main preview. When setting the main preview for another image, this checkbox is automatically unchecked.
The main preview is placed automatically at the root of the archive when packing. This is done for convenience, since the preview can be seen on the folder icon without opening it directly. And also, it helps in cataloging for example for the Project Manager, Design Connected or Asset Libraries.
Watermark
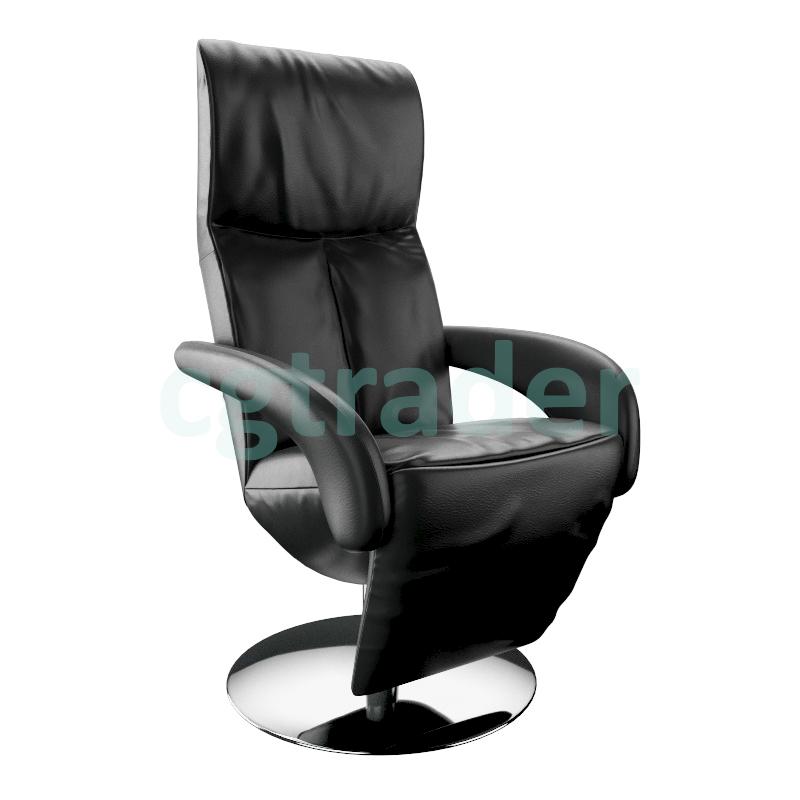
To protect your previews with copyright, you can overlay them with a watermark.
An example of how this will look can be seen in the picture above (translucent cgtrader logo).
To add a watermark, enable the Use Watermark checkbox and select a logo image.
By default, the watermark will occupy 60% of image and will have 15% opacity enabled.
For better quality, use the logo:
- PNG format
- Size 2000px
- Transparent background
Note!
For some presets, watermark settings may be different and/or locked, and adding a preview may be required!
Model Pack (Step 5)
On this page, you can make the final packing settings and create an archive.
Settings
For some presets, the settings group may not be available!
If you have selected a preset for 3D stock, and this group of settings is active, it means that the rules do not prohibit changing some settings. But we still recommend that you familiarize yourself with the 3D stock rules, since some options can be critical (for example, the presence of at least one export format).
3Ds Max - the version for which the scene with the model will be saved. It is recommended to choose the minimum version!
FBX, OBJ, 3DS - exports a scene to different standards. It is recommended to keep at least FBX.
MAT - exports scene materials as Material Library standard (*.mat). Such a library can be opened in the Material Editor → Open Material Library ...
Rename Textures - renames all textures and reassigns new paths.
Rename Materials - renames all materials and maps.
Rename Objects - renames all objects in the scene.
Rename Groups - renames all groups in the scene.
Remove Layers - removes all layers and transfers all objects to a separate layer with the name as model name.
Convert To Corona - adds a new scene to the archive, automatically converted "on the fly" using the Corona Converter. To use this option, you must have Corona Renderer and Corona Converter installed.
Note!
It is recommended to leave the checkboxes checked for renaming objects, groups, materials and textures!
Summary
Brief information about the model and the filled data. This data can be stored in manifest files (txt, ini, json, xml).
Before packing the model, pay attention to items such as:
- Your Selected Preset
- Units
- Render
- Lights, Cameras, Animation
Model packaging
Choose the location yourself - If enabled, you can choose the path and name of the archive to save yourself, otherwise the archive will be created near to your model scene.
Save and open this scene after packing - If enabled, save the scene before packing. It is recommended that you leave this option enabled, otherwise you may lose unsaved data or settings and form filling in Model Packer.
To create an archive with a model, click on the Pack Model button and an archive will be created in a short period of time!
During packing, 3Ds Max may freeze temporarily, reopen the scene, and display the Corona Converter script.
Do not perform any actions until the end of the package and do not try to close 3Ds Max, otherwise it will interrupt the archive creation process!
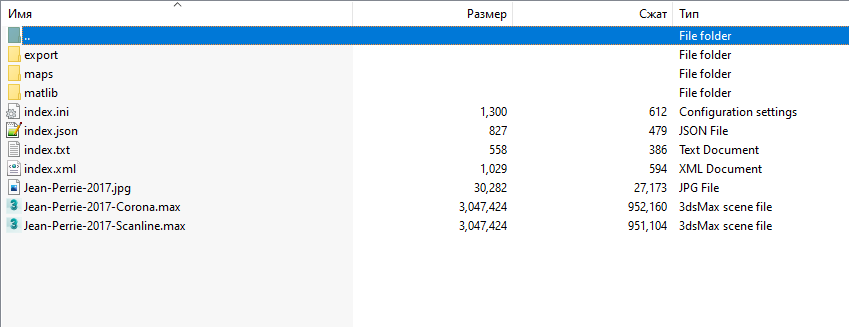
After finishing packing, you will be prompted to open the folder with the newly created archive. You can also find an archive next to your 3Ds Max model scene.
An example of an archive with a model, you can see in the picture above.
Note!
During packing, Model Packer also performs actions that are not visible to you, for example:
- Removes unnecessary garbage, lights and helpers before exporting to fbx, 3ds, obj
- Removes Track Notes
- Checks for textures, and if it doesn’t find it, it shows you a message
- Sets the FBX version on export
- Removes unnecessary assets, materials and geometry from the scene
- Focuses Viewports view on model
- And more
If none of the presets from the list suits you, you can create your own using Create/Edit Preset. There you can fine tune and access hidden features!
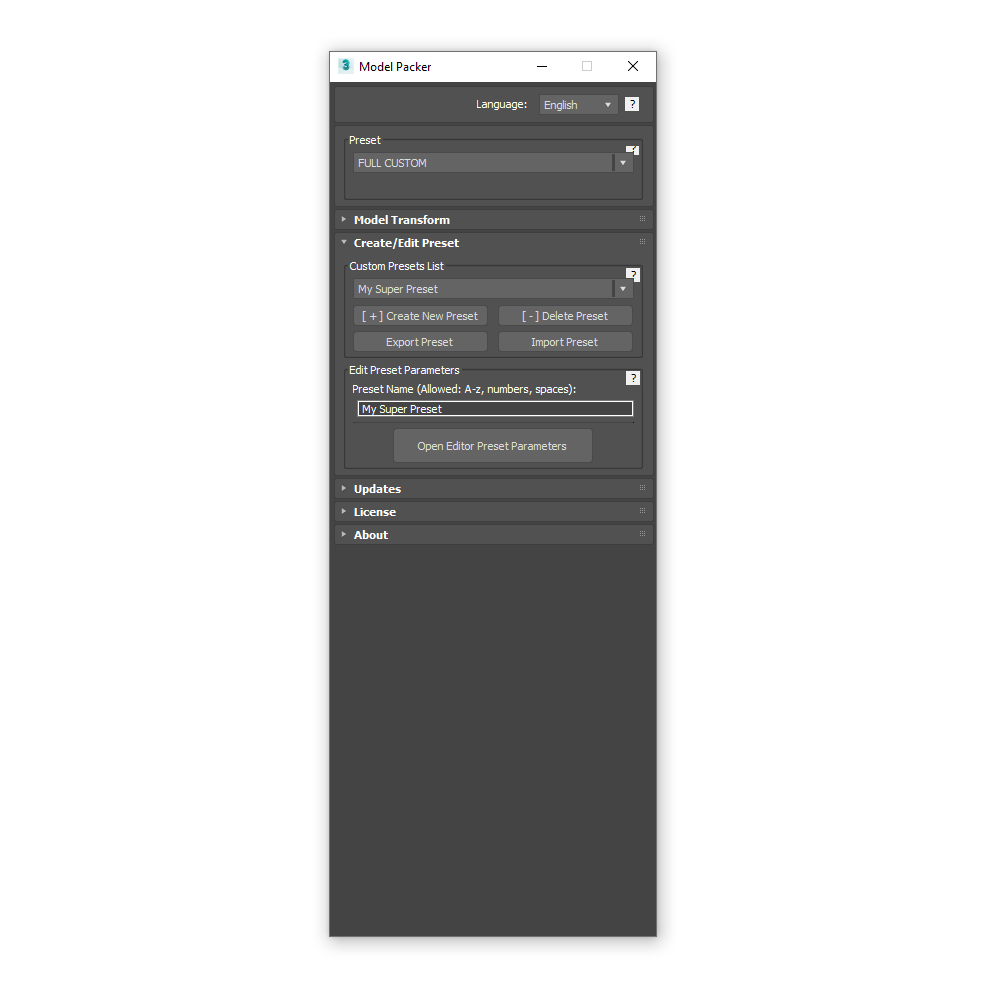
Create/Edit Preset
his section helps to organize work with presets: create, delete or import/export.
Video How to create your own presetNote!
You cannot edit the presets that come with the Model Packer!
[+] Create Preset - creates a new preset. Created preset will be automatically selected in the preset list.
Edit immediately its name in Preset Name.
[-] Delete preset - deletes the selected preset from the list.
Export Preset - exports the preset selected from the list. All settings, including auto-filling of forms and even a watermark picture are exported into one *.prst file. By transferring a preset, you can be completely sure that all settings will be imported correctly!
Thanks to the export of a preset, you can transfer settings to a colleague at work, in order to comply with the packing standard. You just need to adjust the preset once and you can use it over and over again.
Preset Name - you can always edit the name of the selected preset. For the name, use the English characters from A to z, numbers and spaces.
Open Editor Preset Parameters - opens a full list of settings for the selected preset.
Creating a new preset
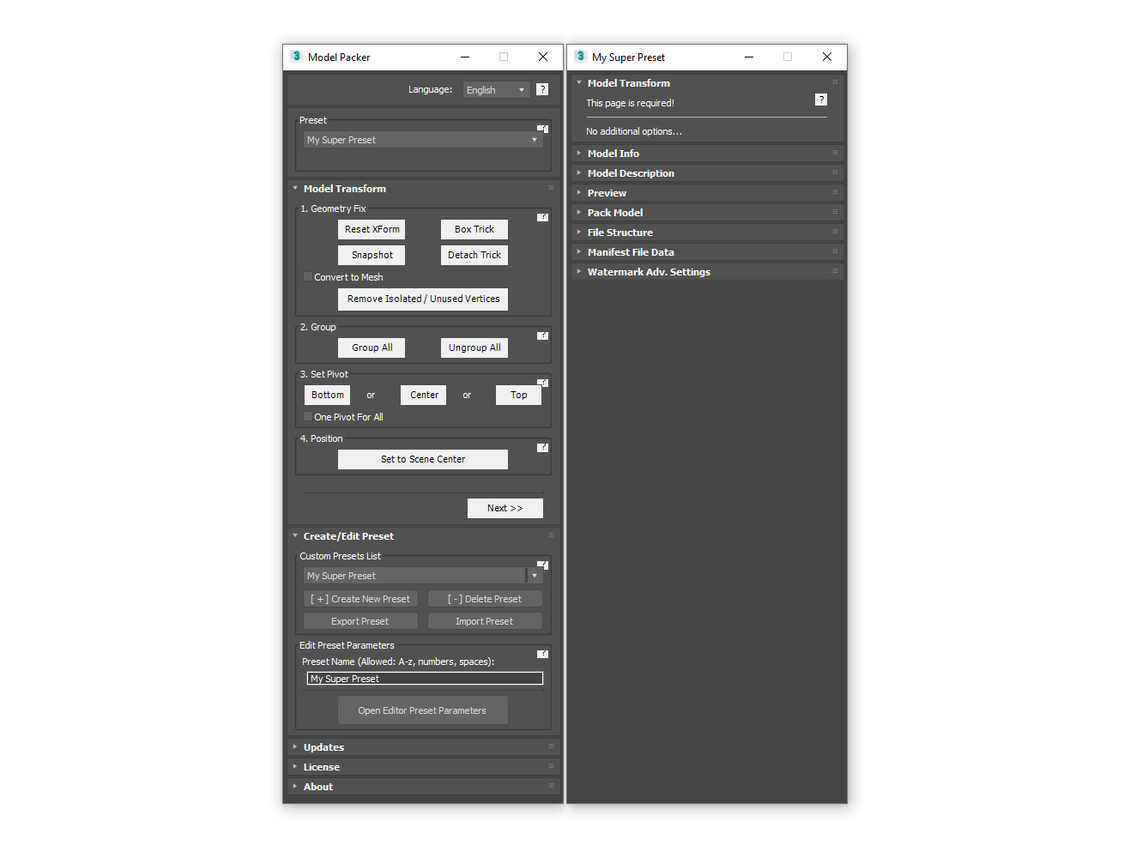
To create a new preset, click on the [+] Create Preset button, edit its name in Preset Name , then click the Open Editor Preset Parameters, for fine-tuning.
By default, when creating a preset, its settings will be identical to the FULL CUSTOM preset, i.e. all possible options will be available.
Read more about all the settings below.
Preset Settings: Model Transform
The Model Transform page is required. There are no settings for this page!
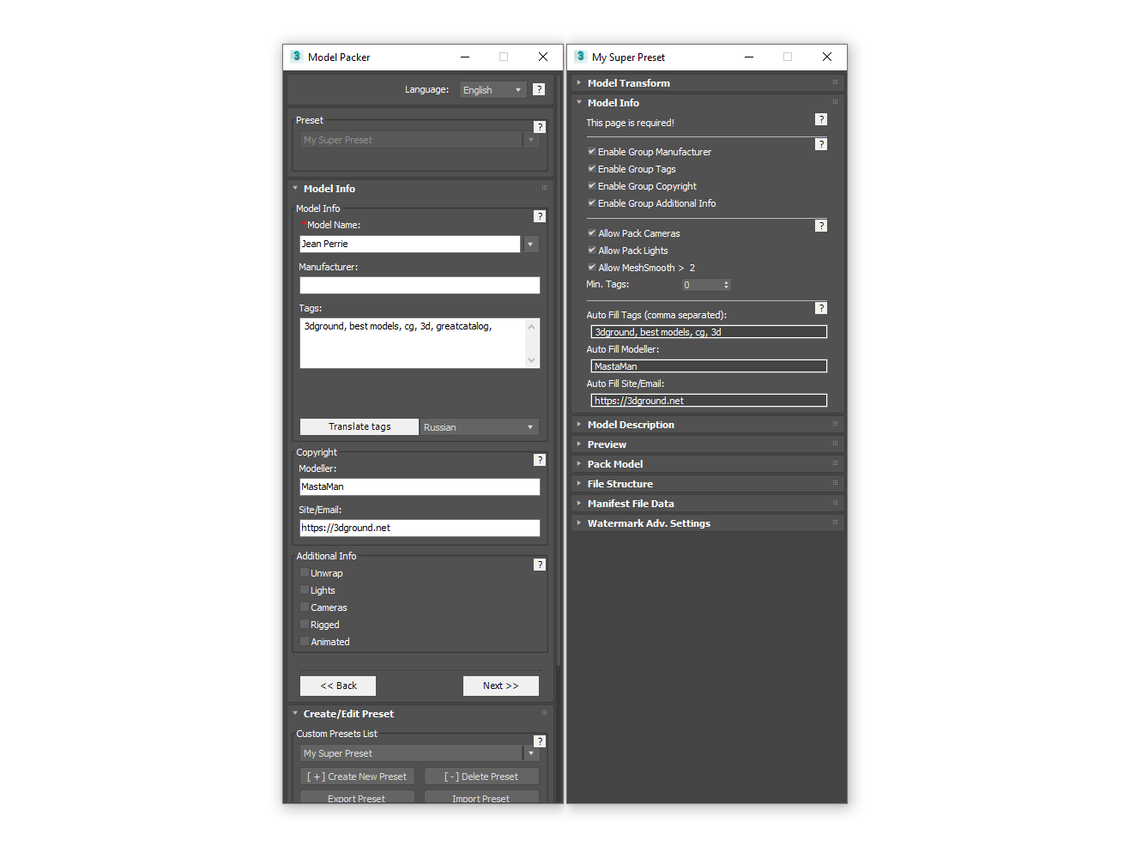
Preset Settings: Model Info
The Model Info page is required.
Enable Group Manufacturer - enable/disable the group, makes the Manufacturer form inactive.
Enable Group Tags - enable/disable the group, make the Tags form inactive.
Enable Group Copyright - enable/disable the group, makes the Copyright form inactive, which includes the Modeller and Site/Email forms.
Enable Group Additional Info - enable/disable the group, makes the Additional Info. form inactive, which includes checkboxes Unwrap, Light, Cameras, Rigged, Animated.
Note!
If, you turn off the group, then the user will not be able to enter any data in the corresponding forms. But at the same time, autocomplete for forms will work. This way, you can define certain settings that the user should not change!
Allow Pack Cameras - is a hidden setting that can prevent cameras from being left in the scene. If the option is disabled and there are cameras in the scene, the user will not be able to proceed to the next step until all cameras have been deleted. The user will be notified about this with a special message.
Allow Pack Lights - is a hidden setting that can prevent lights from being left in the scene. If the option is disabled and there are lights in the scene, the user will not be able to proceed to the next step until all lights are removed. The user will be notified about this with a special message.
Allow MeshSmooth > 2 - is a hidden setting that can prevent leaving objects with the MeshSmooth or TurboSmooth modifier, in which the iteration value is greater than 2. If the option is off and objects will be present in the scene with anti-aliasing modifiers and an iteration greater than 2, the user will not be able to proceed to the next step until the stacks collapse or remove those modifiers. The user will be notified about this with a special message.
Min. tags - is a hidden setting that will prevent the user from going to the next step if the number of tags is less than the specified one. If you leave the value 0, the check will be disabled and this form can be left blank.
Note!
These hidden options, you will not find on the Model Info page, and they work at the preset level.
It is recommended to leave the default values.
Auto Fill Tags - if you are filling the same tags, set up autocomplete. Separate tags with commas. For example: 3dground, cg, 3d, best models.
Auto Fill Modeller - If you are constantly filling in your name as a modeler, set up Auto Fill.
Auto Fill Site/Mail - if you are constantly filling the site or mail, set up autocomplete.
Note!
Autocomplete helps save time filling out the information you enter each time.
Try it out as it is convenient!
Autocomplete works even if certain groups are disabled for editing.
Thus, you can set the default settings that the user cannot change.
Preset Settings: Model Description
The Model Description page is optional. You can disable this page completely.
Page Enabled - with this setting, you can completely exclude the page.
Auto Fill Description - if you are constantly filling the same description, set up autocomplete.
Auto Fill Custom1 - if you are constantly filling the same Custom1 attribute, set up Auto Fill.
Preset Settings: Preview
The Preview page is optional. You can disable this page completely.
Page Enabled - with this setting, you can completely exclude the page.
Enable Group Watermark - enable/disable the group, makes the Watermark form inactive, which includes the Use Watermark forms and select the path to the watermark.
Min. previews is a hidden setting that will prevent the user from going to the next step if the number of added images is less than the specified one. If you leave the value 0, the check will be disabled and this form can be left blank.
Auto Fill Watermark Path - select the path where your watermark logo is located. The watermark will be placed on all user-added previews. The Use Watermark setting will be automatically enabled. By specifying the path, the logo will be copied immediately to the system folder of the Model Packer installation. And when exporting a preset, the logo will be saved to a *.prst file, and will be correctly transferred along with the rest of the settings.
By default, the watermark will occupy 60% of the image and will have 15% opacity enabled. For the best quality, use the logo: PNG format, size 2000px, transparent background.
Clear Watermark - clears the path to the watermark.
Note!
To fine-tune the Watermark, use the Watermark Adv section. Settings!
Preset Settings: Pack Model
The Pack Model page is required.
Enable Group Pack Settings - enable/disable the group, makes the Settings form inactive, which includes the 3Ds Max Version, FBX, OBJ, 3DS, MAT, Rename textures, Rename materials, Rename Objects, Rename Groups, Delete Layers, Convert to Corona forms.
You can control the default settings that will be used when packing. If you disable the Settings group, the user will not be able to change the default settings.
TXT, JSON, XML, INI - is a hidden setting that determines which manifest files go into the archive.
Create zip archive with 3D Model - archives the model and assets. If off, creates a folder with model and assets. This option is useful for local and network Asset Libraries, where you need quick access to * .max files.
Attention!
The archive will not be created if you specify the network save path!
Create folder with model name - this option is relevant only if you have disabled the option with creating a zip archive. If disabled, an additional folder will not be created in which the scene with the 3D model and assets will be placed.
Disabled options "Create zip archive with 3D model" and "Create folder with model name" are most often used when creating a local or network Asset Library. Thus, the files will not be archived, which gives quick access to them, and the exclusion of adding files to an additional folder will allow scenes with 3D models and previews to be seen in one folder. This combination allows you to use, for example, the free software cataloger Connecter, from which you can quickly view and access the database of models.
Textures Paths :
- Relative - will remove the extra part, the result is /maps/displace.png
- Absolute - will leave the full path and replace with the packing path, the result is D:/0_AssetsLibrary/Ligths/Model1/maps/flare.png
- Do not change - will leave the current paths, the result is Z:/Downloads/texture1.png
Initial Path - the default path for saving the archive. You can specify the path to your Asset library and this way the script will always link to the right place, this eliminates the routine of choosing the right folders before packing.
Below is an example of settings for creating a local or network Asset Library.
License Limitations!
In the free version of Model Packer, you cannot turn off the addition of the TXT (* .txt) manifest file!
How and what the manifest files are used for, read the Manifest files and API section below.
Preset Settings: File Structure
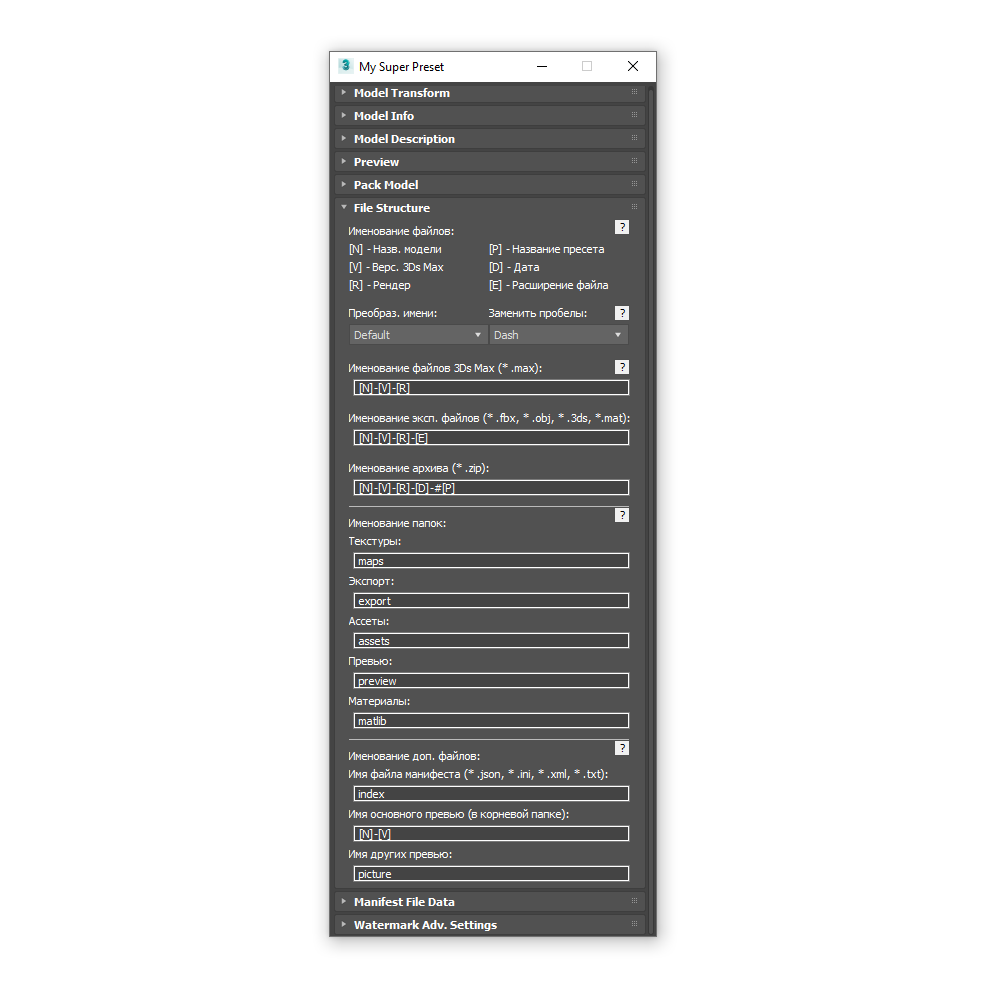
This hidden section will help you set up the file structure in the archive. Here, you can change the name of files and folders.
General rules for naming folders and files:
- Use only English characters from A to z, numbers and spaces
- DO NOT use special characters (Example: &%@!#^* and others)
- Use dynamic masks to substitute model name, 3Ds Max version, render, date and more
- For filenames add a mask [E] , this will help you understand what the file, for users who do not have the display of the file extension in the file browser enabled
- You NOT can leave the file names empty, otherwise the files may not be created
- You can leave the folder names empty, this means that the files will go to the root of the archive
Attention!
If, for some reason, you did not create the necessary files or they are not named correctly, then you made a mistake in naming!
Strictly follow the naming rules to avoid these problems.
Use dynamic masks in the names of files and folders, this will help you create a unique structure:
[N] - Model name
[V] - 3Ds Max version (Example: 2016)
[v] - Version 3Ds Max short (Example: 16)
[R] - Render name
[P] - Preset name
[D] - Current date
[E] - File extension (only applicable to filenames)
[/] - Creates additional nesting of folder/folders (applicable only to folder names)
Example 1: If you use a mask, [N]-[V]-[R]-[E], then the file will be named Jean-Perrie-2013-Corona-fbx.
Example 2: Using other spaces, [N]_[V]+[R], the file will be named Jean-Perrie_2013+Corona.
Example 3: Using text and mask, 3d_model_[N]_[R], the file will be named 3d_model_Jean-Perrie_Corona.
Example 4: using mask [/], [N][/]textures, the folder structure will be /3d_model_Jean-Perrie_Corona/textures/displace.png .
Naming Transform - forcibly converts file and folder names to a specific case:
- Default - no change (Example: Jean-Perrie-Chair)
- Uppercase - all names in uppercase (Example: JEAN-PERRIE-CHAIR)
- Lowercase - all names in lowercase (Example: jean-perrie-chair)
Replace Spaces - forcibly replaces spaces with the specified ones. The characters " ", "-", "_" are considered spaces.
- None - do not replace spaces (Example: Jean Perrie Chair)
- Dash - replace spaces with dashes "-" (Example: Jean-Perrie-Chair)
- Underscore - replace spaces with underscores "_" (Example: Jean_Perrie_Chair)
Note!
If your file name is "3d_[N] [V]-[R]_[E] " and you set to replace spaces with Dash, then all spaces will be replaced as a result symbols and will be:
"3d-Jean-Perrie-2014-Corona-fbx ".
File naming (* .max, * .fbx, * .3ds, * .obj, * .mat, * .zip):
- Use A-z characters, numbers, spaces
- Names NOT can be empty
- If the "Convert to Corona" option is enabled, regardless of whether the [R] mask is present, the renderer name will be forcibly added for * .max and * .fbx files
- If the [V] mask is not specified for export formats, then for the *.mat file it will be forcibly added version 3Ds max
Folder naming:
- Use symbols A-z, numbers, spaces
- If the folder name is not specified (empty), it means that the folder will not be created, and the files will go to the archive root
- Mask [E] does not work for folder names
- It is not recommended to use masks [R], [P] and [V]
- You can use the mask [/] to create deeper folder nesting
Note!
If you need the export files (*.fbx, *.3ds, *.obj, *.mat) to be placed in the archive root, leave the name of the export folder empty.
This also works for other folders.
Naming Additional Files :
- Use symbols A-z, numbers, spaces
- Names NOT can be empty
- It is not recommended to use masks [E], [P] and [D]
File Structure is a pretty powerful tool that helps you create your own order of files and folders. Because of this, the Model Packer script can be used for almost any purpose, and even in personal libraries. This can be said to be an aggregator that has collected the best in itself and brought everything to a single standard.
That's why Model Packer is the standard in the 3D industry!
Preset Settings: Manifest File Data
This hidden section will help you configure the data added to the manifest files.
To select what data should be included in the manifest files, select the necessary checkboxes.
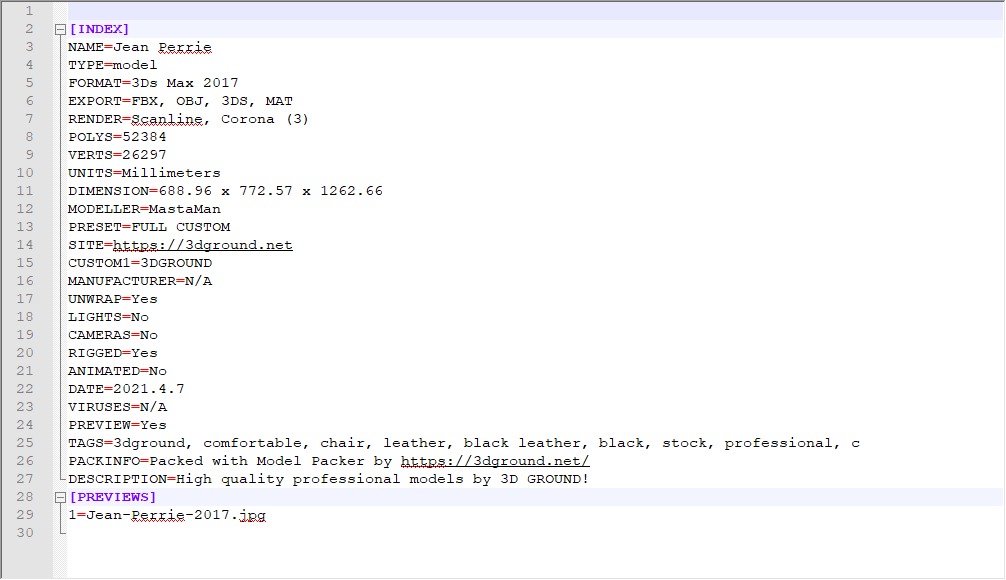
Manifest files are files with the extension *.json, *.ini, *.xml, which contain information about the model and it is convenient to work with these files for other programs or uploaders. Imagine that you need to get a name and tags from this model, for example, this is easy to do by simply referring to these parameters in the manifest file, for example:
getIniSetting "index.ini" "INDEX" "name"
getIniSetting "index.ini" "INDEX" "tags"
License Limitations!
In the free version of Model Packer, you cannot disable some of the checkboxes, for example: Name, Type, Viruses, Preview and Packinfo!
Example JSON file manifest:
Example INI file manifest:
Example XML manifest file:
Preset Settings: Watermark Adv. Settings
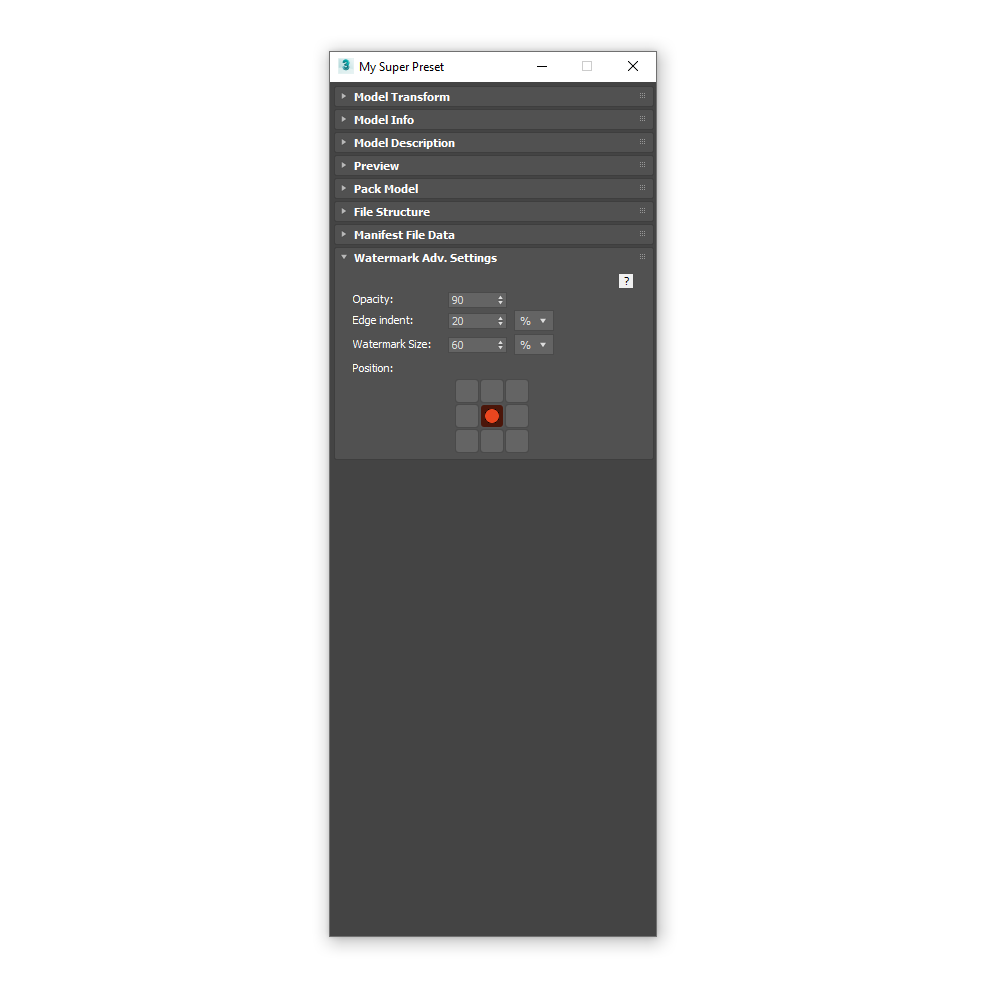
This hidden section will help you fine-tune the Watermark.
Opacity - transparency of the Watermark, 100% - fully visible, 0% - invisible.
Edge indent - edge indents, can be specified in px or percentage.
Watermark Size - the size of the Watermark, can be specified in px or as a percentage.
Position - click on the corresponding button to set one of the provided positions.
Below is an example of a Watermark, with settings:
- Opacity: 75%
- Edge indent: 2%
- Size: 20%
- Position: Right, Bottom
API
The description of the API functions is moved to a separate section. Follow the link below:
Model Packer - APIImportant!
API works only for the licensed version of Model Packer!
Update system
The automatic update system allows you to download and install a new version of the script in quiet mode.
Important!
The update is available only for those who have purchased a license key!
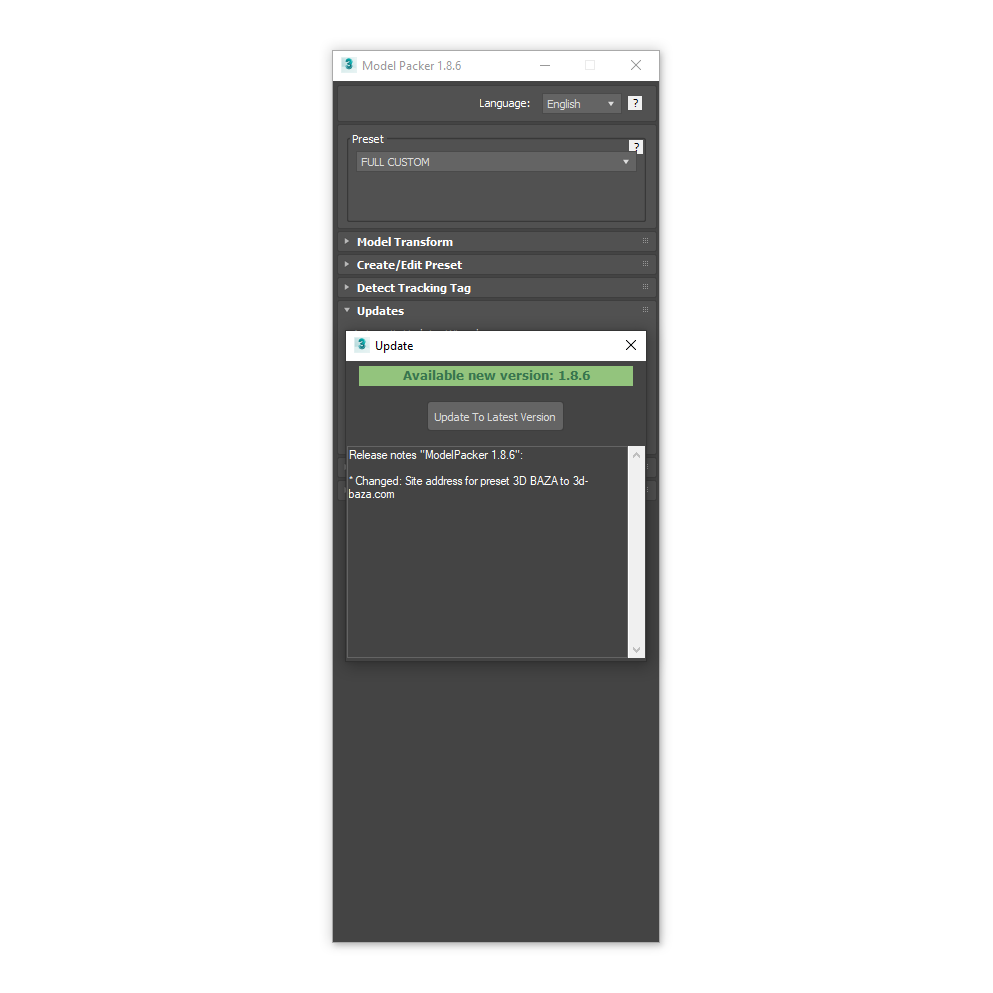
Click the Check For Updates button.
If fresh updates are available, you will see a green indicator with the new version.
Click Update To Latest Version and wait a few seconds. After a successful update, you will see a message:
Restart Model Packer and enjoy the new version 😊
Batch Pack (Bonus)
Note!
This section is available only to users who have bought a license!
Section Batch Pack allows you to massively pack your 3D models to the requirements of different 3D Stocks. This is especially convenient if you download the same models to various sites with different packaging standards.
For example:
- For the Great Catalog stock you must add previews and export formats FBX+MAT to the archive.
- For CGMOOD, only one additional FBX format is required.
Now you do not need to remember the packaging rules - trust this Model Packer. The process is fully automated and suitable for a large number of models.
Search models
Search in Current Scene
Models can be sought in the current open scene by objects, groups or layers.
Follow simple rules:
- Objects
The model should be the same Editable Poly without unnecessary modifiers. It is advisable to perform Reset XForm and set the correct center of mass.
The name of the model is taken from the name of the object.
- Groups
There should be no groups containing subgroups in the scene. One group = one model.
The name of the model is taken from the name of the group.
- Layers
There should be no layers containing sublayers in the scene. One layer = one model. The default layer (default (0)) does not participate in the package.
The name of the model is taken from the name of the layer.
Search on HDD
Search *.max files are made in the folder or its subfolders you specified. One file (*.max) = one model.
The name of the model is taken from the name of the file.
Use Preset
You can choose one or more presets at a time (for a multiselect, use Ctrl + click mouse). Your settings are saved even after the script is closed.
Important!
When choosing a large number of models and presents, the packaging process can hinge on for a long time and lead to a lack of RAM or freezing 3Ds Max.
For example:
If you have 10 models and 8 presets, you will receive 80 archives. Packaging of this amount can take a long gime.
Geometry Fix
You can automatically correct the geometry of models using operations such as:
- Reset XForm
- Box Trick
- Detach Trick
- Snapshot
These operations help to collapse the stack of modifiers and convert the model into Editable Poly.
Use carefully!
After correcting the geometry can "explodes ", the modifiers can incorrectly collapse, and the position of the model can change.
If you are not sure, process the models manually before packaging.
Also note that the fixing of geometry increases the packaging time.
Position/Pivot
You can automatically set the center of mass:
- Bottom
- Center
- Top
If necessary, you can automatically move the model to the center of the scene.
Find Previews
The script is looking for *.jpg and *.png files in the folder you specified.
The names of the preview should begin with the name of the model: Your_Model_Name*.jpg
This allows you to add a few preview files to the archive, for example:
- Your_Model_Name.jpg
- Your_Model_Name_wireframe.jpg
- Your_Model_Name-preview-10.jpg
Important!
Use unique names for models to avoid coincidences. For example, if the model is called Plant, then Plant_Monstera.jpg, Plant_ficus.jpg, etc. can accidentally be found.
Batch Pack Models
After all the settings are completed, press the packaging button. Next, you will be asked to choose a folder where to save the archives.
Before starting packaging, you will receive a warning about possible risks:
- The ability to freeze the process 3dsmax.exe.
- Lack of RAM.
- The need to make backup copies.
- The risk of damage files and other unforeseen problems.
After consent, the packaging process will begin.
Important!
During processing, do not interact with the computer and do not open the other 3Ds Max windows. Do not end the process forcibly, even if it takes a long time. This can lead to loss or damage to files.
At the end of the process, make sure that the archives are formed correctly. For verification, it is recommended to unpack and open the received files (*.max).
License
This script is distributed under a shareware license. This means that you can use Model Packer absolutely free!
All basic functions will be available for free, except for the automatic update function by click of a button Check for Updates or other items specified in the "Obtain license" section. below.
Unfortunately, the development and various kinds of improvement of this software is impossible without your support, both tangible and intangible.
In addition to the basic functions, the script added: quick updates, multilanguage interface, convenient installer, well-described manual in several languages - all thanks to your support!
We really appreciate your contribution to development, be it purchasing a license, reposting or liking on social networks, recommending to a colleague, reviewing on a video hosting or forum, suggestion for improvement, your feedback, and more. And we are grateful to you for your indifference to this product!
At the same time, we are well aware that not everyone can make a tangible contribution - without such an opportunity, for example, being a student or not receiving income from your work in 3Ds Max, and we do not require this from you. Therefore, we made the product free to use for absolutely everyone! We perfectly understand the inconvenience of subscriptions or the dependence of the license on the version, or other ways to stimulate sales and repeat purchases - so we abandoned this in favor of convenience and made lifetime licenses.
We hope for your understanding and desire to really help the development of our resource. The complexity of development increases with each new release, and lifetime low-cost license keys do not bring super-profits. If you want the project to develop and improve - purchase a license key.
By purchasing a license, you are not only contributing to the future of this software, but also encouraging other useful products.
After all, we are trying for you 😊!
For a more detailed description of what features the license provides, read below...
Purchase LicenseObtain License
- You disable the modal window when you run the script, where you need to press 1, 2 or 3 to close it
- Lifetime updates will be available to you
- You will have access to the Batch Pack (Bonus) section, where you can do mass packaging of 3D models for many presets
- You will be able to fully customize your own presets (full control for manifest files)
- You will have access to the update option by pressing one button Check for Updates
- You will support the author and continue developing this script
- You will receive full support
- You will be able to participate in the development of the script
License Agreement
- This software is free for everyone to use
- You can use almost all the functions of this software for free
- You can use 1 (one) license key for a maximum of 2 (two) computers (Home and Work)
- The author does not bear any responsibility for the possible loss of data on your computer or other damages associated with this software
- You may not transfer to third parties persons or sub-lease the license key
- You are not entitled to profit from the use or provision of the license key, either for direct commercial, monetary or other benefit
License Message
Every time when you launch Model Packer, you will see a message asking you to buy a license.
To close this window, press 1, 2 or 3.
Look at the message "For close this window press button #...".
By closing this window, you can continue to use all functions for free (except for those indicated above in the "Obtain license" section).
Purchase and using a license key
To purchase a license key, go to the product page:
Model Packer PageAnd click Buy.
Or click on the link >> Press here for buy License Key <<, in the script license window.
You will be redirected to the payment page.
Choose a convenient payment method. Please fill in your Name, Surname and your email correctly.
Important!
Please provide correct information when making a purchase! A message with a license key will be sent to your email address!
You can use the license key on a maximum of 2 computers (Home & Work) .
Your license will work permanently and you will receive lifetime updates!
After payment, find your license key on the email you specified. Find it and copy it to clipboard.
Paste the key you copied into the license notification window.
If you did everything correctly, when you start the script, you will no longer see the license message.
And, in the License rollout, there will be a message about the lifetime license.

 English













{{comment.text}}